Showing posts with label A Home in Hoya. Show all posts

Saturday, 23 June 2018

Our Home in Hoya Progress Report No.1

Joists and Bearers

Building is progressing at great pace and we are finally getting an idea of what our home will really look and feel like.

Sometimes I think the house looks HUUUUUGE and others times, just perfect size for two of us, a few pets and a massive garden. 
From the top of the block she doesn't look so big. The two pics below show how she sits into the hill. This is something I wanted. Not a huge pretentious blot on the landscape. 


The side view of the build, however, shows that there is quite a slope on the block.


John can easily stand under the balcony that opens from the master bedroom.

I suppose that size can be considered relative in many situations. It is all a matter of perspective. Check out the house from the bottom of the block. It seems to span the width of the block which I assume is because of the slope.


I am still struggling to find ideas for the breezeway gaps. This one is between the living area and master suite. It is slopey and on the southern side of the house so won't get much sun. Any idea anybody? 
My latest bright idea is a simple metal structure that will support creepers. 
Something like this? Post a comment or suggestion.
John's been practising his drone skills again so check out his latest video. 


We are visiting Our Home in Hoya every fortnight so why not follow my blog for regular updates. 


Sunday, 10 June 2018

Eggless Strawberry Ice Cream


The punnets of strawberries were cheap this week so what better way to soothe a sore throat than with ice cream. 

This recipe contains no eggs. I know that commercial ice cream has eggs but I try not to think about it when I am tucking in to my favourite bought flavour. Making ice cream is however, quite different. The thought of half cooked egg in a chilled dessert just puts me off making ice cream so I have scoured the internet and tried many variations of frozen ice cream and sorbets to find delicious recipes.

This is the simplest recipe for ice cream that you could hope to find. There is also flexibility with the recipe which is great.

Sugar- I use raw sugar because this is what is sitting on the kitchen bench. Plus it also gives a deeper flavour.

Cream and milk- Depending on your preference, all milk, a mix of both or all cream can be used to make 2 cups in total. I tend to use 1 cup milk and 1 cup cream. It isn't as icy as all milk but if you want really creamy ice cream, then use all cream.

Vanilla- I like it but it doesn't matter if you haven't got any. 

Food colouring- If you like really pink ice cream. I don't use it because I think the ice cream is pink enough. 

If you don't have an ice cream maker, do not worry. The instructions for making it without are included. It is worth it!

Ingredients

1/2 cup sugar
1 cup milk
1 cup cream
1/2 teaspoon vanilla
1 x 250g punnet fresh strawberries.


Method  
1. Warm milk in the microwave until hot to touch.
2. Add sugar and stir until dissolved.
3. Place mix in refrigerator until chilled.
4. Add milk mix, cream, vanilla and hulled strawberries in a blender and blend until smooth.
If you have an ice cream machine:
5. Pour mixture into ice cream machine and follow instructions.
6. Store in freezer.

If you don't have an ice cream machine: 
5. Place a freezer safe pan or bowl in the freezer when starting to make the ice cream so it is chilled.
6. Transfer your mixture into the cold pan and put it back in the freezer for about 20-30 minutes. Around that time, check the ice cream. 
7. Once the edges start to freeze, take out the mixture and beat it using a hand mixer.
8. Return the pan to the freezer. Every 30 minutes or so, take it back out and beat the ice cream again. Repeat until it is firmly frozen, usually around four or five mixing sessions. Once it’s frozen, the mixture should be smooth and creamy.

Store your ice cream in the freezer. Enjoy!


Another fabulous portrait by John!


Sunday, 6 May 2018

Modern DIY Garden Sculpture

I like garden art but not the sort that I used to see out of the Vauxhaull window when I was a child. Concrete gnomes and tyre swans are not for me. Neither are grecian ladies with urns or little boys relieving themselves in a pond. 

My style is much more ecletic. I also was born with the "diy" gene so I spend hours pouring over others ideas trying to convince myself that I too can make them with my very limited skills. But I have to be optimistic and have had some success in the garden art department. I have always had  passion for Japanese lanterns; the stone variety, not the paper ones. When we decided to build a Japanese lantern at our current property I had to have a lantern. Australia is not very much into this so purchasing one proved to be not only very costly but almost impossible. So I made one out of concrete. 


Once we had worked out the shape and containers it was a simple job. Inside the light box is a lamp which is wired into the string of garden lights that runs the length of the garden. 
The question is, should we dig this up and take it with us or make another one? 


I am collecting ideas for garden art that I will be able to make myself. To be included in the list, they have to have most of the following criteria:

  • simplicity
  • 'gentle' in the landscape
  • a bit quirky
  • easy to make. 


This simple sculpture from Sprawlstainable adds height, colour and also provides illumination at night. The instructions make it look easy. 
The spikes are made out of pvc piping which have some bend in them when they are long. 

The use of metal piping would provide greater sculpture capability. Copper is an expensive metal to use but has a quality about it that it irresistible. 


This copper coil from Suzy Homefaker shows just how much potential there is with copper. 


This Raintree Sprinkler is divine. It isn't however for us. Care to conserve water will be required and this tree is not very appropriate. A large proportion of the water would be blown away in the breeze as it is a long distance from the ground. 


In keeping with the metal theme, these  tubes would create some height in a new garden. They are simple and show off the unique succulents beautifully. What a lovely metal garden edge they would create. 


I love 'round.' It avoids the need for sharp and accurate corners. These concrete spheres create simplicity and a feeling of tranquillity. The garden glove has instructions for these and many other spherical garden features. 

Here is another quirky way to present succulents and add height with these concrete spheres on stilts.
A mystical glow is created with these hollow gold candle holders


Terracotta pots are fabulous. Cheap and cheerful, they can become much more than a single potted marigold. The instructions for this dome and a sphere are on iCreative Ideas
I love the simplicity of this couple that I found on ARCHITECTUREHD.
If I am to have a birdbath this is what I would like. Made by the very talented  Toni Armeni 


 Need a bit of quirk? These tin can owls are simple to make and are a creative way to use up pet food tins and containers that usually go to waste. Anyone could make these. 

 Everyone needs somewhere to sit in their garden and take in the view. Instructions are hardly needed for this concrete block and timber bench.
This ostrich, created by John Doll is almost 2 metres tall. 
I love scrapyard animals. The pieces used create a personality. Here are a couple of birds made out of shovels, reo and other left overs. 
All I need to do now is decide which one to make first. 


Saturday, 28 April 2018

We have broken ground!


We are off and digging! What more could we ask for. There is a sign, a portaloo and a water tank full of water. 

Here is a bunch of photos and a video so you can watch the build with us and give us lots of ideas about landscaping. 


Majestic piles of dirt perfectly frame the portaloo. 


It was a glorious Autumn day which shows off the portaloo nicely.


View from the top of the driveway. It curves to the right as it descends down the hill.


Dirt, glorious dirt! 


The view is amazing. 


My mind is in overload with landscaping questions. The block is naked so I have free reign. Well not exactly. John has a fear of gum trees crashing through the roof and fruit trees that are too large to harvest. I will collect some ideas for trees and ask you all for your opinions. 

Progress report coming again in a couple of weeks. Please follow my blog so you don't miss an episode. 

Trust me, I am not doing the earthworks. 


Monday, 26 February 2018

Colour selection for a new home


We have been "working" on this house build for many months now but alas, no start date as yet. The weather in south-east Queensland has been particularly unfriendly this week that little would have been done on the build even if construction was underway. 


The decisions have all been made so we can relax a bit and just wait. 


Here are some of the colour choices we have made.


Roof. Our current home has a black roof. It looks fabulous but I have always been a bit suspicious that it doesn't help the house stay cool in the summer so it's a "no" for our new roof. I wanted a colour that will blend into the landscape and there will be a lot of roof visible from the road so why not go green? Green roofs seem so out of date so it's also a "no" to green. When there has been little rain for weeks the block looks more like a sandy green so after much discussion, internet looking and samples arriving in the mail, we have settled on COLORBOND Surfmist ®. This will also be the colour of the rendered external walls. 
http://colorbond.com/colour/surfmist


According to the Colorbond website, Surfmist "embodies qualities of freshness, purity, timelessness and independency. Snow, the mist from the sea and surf, pure white sand, and the billowing sails of yachts all remind us of this colour." Yes OK, today I am going with snow.


http://colorbond.com/colour/monument
Gutters. We wanted a contrasting colour to create lines and liked the idea of black so COLORBOND Monument®
it is. A "strong, confident colour that is unashamedly a city colour." Yes, very sheike. As you can see by the photo, a whole roof would look brilliant and also feel brilliant if living in a southern state or close to the arctic circle.  

John and I love timber. It's look, feel and smell. We will have big wooden pillars on the porch and verandah posts. There is something about timber that is raw and natural yet defined. 

We are also practical. Our current home has a floating wooden floor. Looks great but we continually worry about the scratches. It also gets mopped with steaming, soapy water. Something that should never be done as it opens the pores, just like a steam room. 

The tiles we have chosen for the hall, dining, lounge and kitchen are timber look. Is this cheating? Um, maybe but they are also beautiful. 
www.nationaltiles.com.au

I have taken a photo from National Tiles to demonstrate just how beautiful timber look tiles can be. The photo does not do them justice, but this is Nordic Latte, our chosen colour. 

There is not much more to say about colour. The rest of the house will be the modern, 'on trend' colours of nothing really. Off-white, black benchtops, white cabinetry, black bathroom floor tiles. 

Let's hope next week is a bit more interesting than this week has been in house building world. 

Remember to follow my blog if you want to be alerted when something interesting happens. 

Sunday, 18 February 2018

Patience is a necessity when building a house


This fortnight has been frustrating in the house building department.

  • We have been patiently waiting for information from various sources but information is dribbling in slowly.
  • We are patiently waiting for a date for the building to start.
  • We are patiently waiting for the water connection so there can no longer be anything holding things up.
  • We have been slowly sorting through 'stuff' at home trying to make decisions while we patiently wait for the next steps.
I have revised my "let's move in during the winter," to "let's aim to have Christmas here this year." I have been advised not to be a pessimist so I will be very excited to move in during cool weather with plenty of time to be settled before Christmas. Note, specific date or even month not documented. 

All in all, not a lot of progress so let's skip to the fun part and start planning the landscaping.
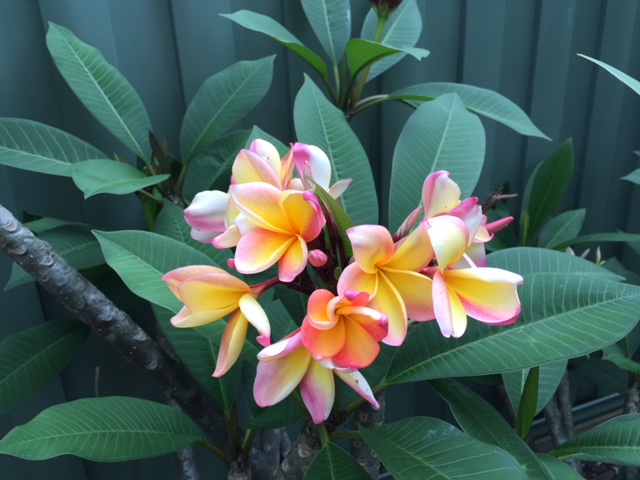
Frangipani Tricolor
When we first bought the land I envisioned a short driveway to the garage and path to the front door. Ahhhh, no that's won't be it. The driveway is more than 30m long and the house is halfway down the block. 


My original plan was to landscape the block in front of the garden fully with garden beds overflowing with large shrubs, ground covers and the odd small tree. The back of the block is for fruit trees, shed, chook house and a vegetable garden. 

So why change course now? 
  • Because the front yard is HUGE and will require many, many more plants and a lot fitter version of Anne to keep up with the maintenance? Yes and yes.
  • Because I can't picture how it will all look in the end? Yes.
  • Because I am concerned about drainage and the possibility of all the plants sliding down the hill in one of the many vicious thunderstorms that form over Hoya? Yes.
  • Hibiscus Aussie Pearl

After lots of thoughts and lack of confidence in my ability and persistence to create something I am truly proud of and enjoy that won't look like a dug up, neglected sheep paddock, I have decided I will be sticking to the plan so let's crack on with it. 

This has given me an excuse to start collecting plants right now. So I have. 
Donkey's Ears


The garden will have the theme of "Australian Cottage," and no, you won't find it in a book. My vision is for the gardens and landscape to look well filled and a bit messy with colour sprinkled throughout. A mix of natives and exotics. This will be fun because they don't always play well together. 


I have put photos into this post of some of the plants that I have already collected for the front gardens of our Home in Hoya. Our current home is  starting to look like a nursery but I can't resist plants. 


Watercolour Rose

I bought 3 Watercolour roses from the clearance trolley at Bunnings. They were scraggly and  bit yellow but I couldn't resist. A month later after some food and plenty of water, all 3 look brilliant. My vision for this is to planted together in a row along the side of the driveway.


Plumeria Pudica


Plumeria Pudica has beautiful and long lasting brilliant white flowers. The leaves are also a weird club shape. The plants themselves are bare at the bottom so I plan to plant these in the centre of a garden bed with low shrubs to cover the lower parts of the plant. I have only 1 of these but should be able to grow more from cuttings. 


Japanese Black Pine


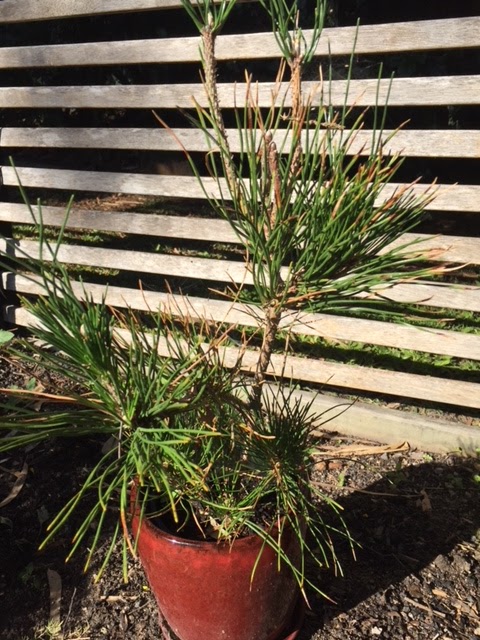
Japanese Black Pine. I first saw one of these at the Mt. Coot-tha Botanical Gardens in the Japanese Garden and fell in love. They are elegant, angular and prickly all in one hit. They are also very slow growing and not easy to find. I have had this plant for a few years now and its growth has been slow. It will take pride of place near the front door. 


Frangipani Darwin Yellow


Frangipanis are back in fashion and come in an ever increasing range of colours.  I have bought a few but most are from cuttings that have fallen off trees that I have been able to access by fair means or foul. Darwin yellow has brilliant yellow flowers and a spicy fragrance that is different to other Frangis.


Hibiscus Citrus Mist


Hibiscus Citrus Mist is one of the range developed by aussie colours. Check out their range here: http://www.aussiecolours.com.au/.

John bought me 3 babies. They are not easy to get. 


I will post more photos of my growing plant collection as I acquire more plants and they are happy to be photographed. 

Now let's get started on building a house.