Monday, 10 September 2018

Marshmallow Caramel Sauce

I have renewed my love of marshmallows. Not from a stuff in the mouth or toast over a smoking fire perspective but as a cooking ingredient. 

Marshmallows have an esteemed history dating back to approximately 2000 B.C when the Egyptians used the root of the mallow plant to make candied delicacies for their gods, nobility and pharaohs. 


Found mostly in Europe and western Asia, Althaea officinalis grows as high as 180cm (6 feet) tall and sprouts light pink flowers. A member of the mallow family, it grows mainly in wet or marshy areas—and thus, "marsh" meets "mallow."

This recipe is super fast and foolproof. Great over fruit, ice cream or both, it can be made ahead, stored in the refrigerator and gently reheated in the microwave whenever the craving takes you. 

Despite the ingredients, it is not sickly sweet like some caramel sauces and bears a striking resemblance to MacDonald's caramel fudge topping. Yummo!

Ingredients
125g butter
3/4 cup brown sugar, firmly packed
100g white marshmallows (Add a few pink if short on white ones. You will never know the difference.)
2 tablespoons milk. 


Method
1. Combine all ingredients in a large, microwave safe jug.
2. Cook on HIGH  for 30 second bursts stirring in between until the marshmallows are melted. 
3. Stir or whisk well to mix.


4. Store in airtight container in the refrigerator if not eating straight away.


Friday, 20 July 2018

Frozen Raspberry Marlow


I have been trawling through old recipe books lately. It is a fascinating pastime that usually results in the conclusion that recipe books are no longer necessary. Every recipe, cooking idea, weights and measures information is available on the internet. Cookbooks clutter up the bookshelves and get dusty.

Last week I was reading a book named, "Cooking with Fruits." Oh, this will be interesting I thought, and sure enough it had weird recipes in it like Fruit Dip for Crudites, Honeydew Melon with Crab, and Veal with Pomegranates. No, none of these were for me. 


So I quickly flicked to the sweet end of the book looking for a delicious creamy dessert or fancy cake recipe. Disappointment slowly mounted until I found this clever little recipe. Well, it is more an idea that can be adapted than a recipe. 

To state the obvious, frozen desserts are brilliant. They can be made in advance then eaten in small or large quantities, by one, a few or many. 

Raspberries- Fresh or frozen are suitable. I use frozen simply because they are cheaper.

Marshmallows- Usually available in vanilla, raspberry or mixed packets. Vanilla will produce a sweeter marlow but not by much. 

Dates- The recipe states fresh but if you can't get fresh or they are too expensive then use the packaged dates from the grocery aisle. It is important to check that there are no pits in them because the food processer can't cope with them and is likely to be damaged.

Cream- The quantity does not have to be accurate. If you want the raspberry flavour to be less intense, add more cream. 

Ingredients
1.5 cups raspberries
125g marshmallows
6 fresh dates
1 cup cream, whipped.

Method
1. Put dates in food processor and dribble boiling water over and allow to soften.

2. Add raspberries and blitz until smoothish. The raspberry seeds will still be visible.

3. Heat raspberry mixture with marshmallows in a small saucepan until marshmallows melt. 


4. Refrigerate until cold.
5. Fold in whipped cream.

6. Freeze until frozen.
7. Enjoy with anything you want. 


Saturday, 23 June 2018

Our Home in Hoya Progress Report No.1

Joists and Bearers

Building is progressing at great pace and we are finally getting an idea of what our home will really look and feel like.

Sometimes I think the house looks HUUUUUGE and others times, just perfect size for two of us, a few pets and a massive garden. 
From the top of the block she doesn't look so big. The two pics below show how she sits into the hill. This is something I wanted. Not a huge pretentious blot on the landscape. 


The side view of the build, however, shows that there is quite a slope on the block.


John can easily stand under the balcony that opens from the master bedroom.

I suppose that size can be considered relative in many situations. It is all a matter of perspective. Check out the house from the bottom of the block. It seems to span the width of the block which I assume is because of the slope.


I am still struggling to find ideas for the breezeway gaps. This one is between the living area and master suite. It is slopey and on the southern side of the house so won't get much sun. Any idea anybody? 
My latest bright idea is a simple metal structure that will support creepers. 
Something like this? Post a comment or suggestion.
John's been practising his drone skills again so check out his latest video. 


We are visiting Our Home in Hoya every fortnight so why not follow my blog for regular updates. 


Sunday, 17 June 2018

Super easy Dip Quiche


It's a bit cold here in south-east Queensland this weekend. By cold I mean less than 20 degrees C. This may not seem cold to many but to me it signals hot lunch.

Add caption
So a quick trip to the supermarket and I had the makings of this incredibly easy quiche. I am a woman of few ingredients so during my searches for recipes I found a fabulous book by Kim McCosker. 4 Ingredients: One Pot, One Bowl. 

Her book has many fabulous recipes. This and her other books are available at Dymocks and other good book stores. Check the link on my blog. 

This recipe, like most that choose, has flexibility. Additions and variation can be added.

Ingredients

  • 1 sheet puff pastry
  • 5 eggs
  • 1 tub (150g) Basil & Cashew Chunky Dip- I used Aldi brand Deli originals. Aldi sweet potato and cashew dip is also delicious.
  • 100g grated cheddar cheese
  • a few slices of ham/salami or 1/5 cup chopped cooked chicken (optional)
  • add anything else you fancy- cooked, chopped vegetables, sun-dried tomatoes, chopped olives.
Method
1. Preheat oven to 180 degrees C.
2. Spray a 25cm pie or quiche dish with cooking spray.
3. Cover with pastry.
4. Crack eggs into a bowl and beat well.
5. Stir in dip and 1/2 cheese.
6. Slice or chop any meats and place evenly over pastry.
7. Pour filling into dish.
8. Sprinkle remaining cheese on top.
9. Bake for 30 minutes or until set.


This is delicious served hot or cold straight out of your lunchbox at school or work. 


Sunday, 10 June 2018

Eggless Strawberry Ice Cream


The punnets of strawberries were cheap this week so what better way to soothe a sore throat than with ice cream. 

This recipe contains no eggs. I know that commercial ice cream has eggs but I try not to think about it when I am tucking in to my favourite bought flavour. Making ice cream is however, quite different. The thought of half cooked egg in a chilled dessert just puts me off making ice cream so I have scoured the internet and tried many variations of frozen ice cream and sorbets to find delicious recipes.

This is the simplest recipe for ice cream that you could hope to find. There is also flexibility with the recipe which is great.

Sugar- I use raw sugar because this is what is sitting on the kitchen bench. Plus it also gives a deeper flavour.

Cream and milk- Depending on your preference, all milk, a mix of both or all cream can be used to make 2 cups in total. I tend to use 1 cup milk and 1 cup cream. It isn't as icy as all milk but if you want really creamy ice cream, then use all cream.

Vanilla- I like it but it doesn't matter if you haven't got any. 

Food colouring- If you like really pink ice cream. I don't use it because I think the ice cream is pink enough. 

If you don't have an ice cream maker, do not worry. The instructions for making it without are included. It is worth it!

Ingredients

1/2 cup sugar
1 cup milk
1 cup cream
1/2 teaspoon vanilla
1 x 250g punnet fresh strawberries.


Method  
1. Warm milk in the microwave until hot to touch.
2. Add sugar and stir until dissolved.
3. Place mix in refrigerator until chilled.
4. Add milk mix, cream, vanilla and hulled strawberries in a blender and blend until smooth.
If you have an ice cream machine:
5. Pour mixture into ice cream machine and follow instructions.
6. Store in freezer.

If you don't have an ice cream machine: 
5. Place a freezer safe pan or bowl in the freezer when starting to make the ice cream so it is chilled.
6. Transfer your mixture into the cold pan and put it back in the freezer for about 20-30 minutes. Around that time, check the ice cream. 
7. Once the edges start to freeze, take out the mixture and beat it using a hand mixer.
8. Return the pan to the freezer. Every 30 minutes or so, take it back out and beat the ice cream again. Repeat until it is firmly frozen, usually around four or five mixing sessions. Once it’s frozen, the mixture should be smooth and creamy.

Store your ice cream in the freezer. Enjoy!


Another fabulous portrait by John!


Saturday, 12 May 2018

Spicy Sweet Potato Soup


This is one of those super simple recipes.

With only 5 ingredients, it takes just a bit of chopping and then a simmer on the stove.

It is also incredibly flexible so if the recipe looks vague, it is because it is and it doesn't matter. Adjust the recipe to suit your own taste and what you have on hand.

Ingredients       

1.5 tablespoons Thai red curry paste- Alter the quantity to suit yourself. This amount gives just a gentle kick.
2 medium gold sweet potatoes. These 2 weighed 1.3kg -  I like the gold ones because of their taste and they are always available and usually cheap. Also easy to grow. 
1 onion- brown or white
1/2 cup coconut milk- This will give a subtle coconut flavour but can be substituted with cream or yogurt.
1 cup water- I like my soup so thick that the spoon almost stands up in it. Add as much as you want to make it as thin as you want
Pepper, herbs to garnish- I used cracked black pepper and continental parsley for this batch. This parsley is the only herb growing well in my garden at the moment so I used it.

Method
1. Heat curry paste in large saucepan on medium heat until it becomes aromatic
2. Add onion and fry for a couple of minutes 
3. Chop sweet potato and add to pan
4. Add water and cook until sweet potato is tender
5. Turn stove off
6. Add coconut milk
7. Blend using stick mixer or blender
8. Add more water if too thick
9. Ladle into a bowl and garnish as desired
10. Serve with buttered toast. 

Monday, 7 May 2018

Gluten-free Peanut Slice


This recipe re-emerged when I gave an old recipe book to Catherine. The day after I gave it to her she presented me with an envelope of hand written recipes that had been lost within the pages of the book. I had forgotten all about this incredibly simple, gluten-free delight.

Here is the recipe for the peanut base. It can be topped with any sort of chocolate topping that you want. A thin layer of melted chocolate or a frosting would be great. I have included a link below for a simple and old fashioned icing made with cocoa. This is a good one if you want the icing to set so the slice can be cut and packed in layers in a plastic pot for travel. 

Ingredients

375g raw peanuts     
2 eggs
1 cup sugar (white or raw)
3/4 teaspoon baking powder


Method
1. Mince peanuts in food processor
2. Add baking powder and whiz to mix in
3. Beat eggs until thick and creamy
4. Mix in sugar and beat again
5. Combine egg mix and peanuts
6. Line base of brownie or slice tin (27cm x 17.5cm x 3cm) with baking paper
7.Spread mix in tin. Smooth surface

8. Bake at 180celsius for 35 minutes 

9. Take care not to overcook as it can easily become dry and hard to cut.  
10. Ice while still warm in tin
11. Once cool, tip out of tin and cut
12. Store in an airtight container. 


Click here for a Simple chocolate icing recipe.


Sunday, 6 May 2018

Modern DIY Garden Sculpture

I like garden art but not the sort that I used to see out of the Vauxhaull window when I was a child. Concrete gnomes and tyre swans are not for me. Neither are grecian ladies with urns or little boys relieving themselves in a pond. 

My style is much more ecletic. I also was born with the "diy" gene so I spend hours pouring over others ideas trying to convince myself that I too can make them with my very limited skills. But I have to be optimistic and have had some success in the garden art department. I have always had  passion for Japanese lanterns; the stone variety, not the paper ones. When we decided to build a Japanese lantern at our current property I had to have a lantern. Australia is not very much into this so purchasing one proved to be not only very costly but almost impossible. So I made one out of concrete. 


Once we had worked out the shape and containers it was a simple job. Inside the light box is a lamp which is wired into the string of garden lights that runs the length of the garden. 
The question is, should we dig this up and take it with us or make another one? 


I am collecting ideas for garden art that I will be able to make myself. To be included in the list, they have to have most of the following criteria:

  • simplicity
  • 'gentle' in the landscape
  • a bit quirky
  • easy to make. 


This simple sculpture from Sprawlstainable adds height, colour and also provides illumination at night. The instructions make it look easy. 
The spikes are made out of pvc piping which have some bend in them when they are long. 

The use of metal piping would provide greater sculpture capability. Copper is an expensive metal to use but has a quality about it that it irresistible. 


This copper coil from Suzy Homefaker shows just how much potential there is with copper. 


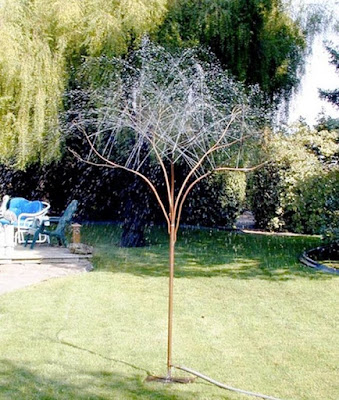
This Raintree Sprinkler is divine. It isn't however for us. Care to conserve water will be required and this tree is not very appropriate. A large proportion of the water would be blown away in the breeze as it is a long distance from the ground. 


In keeping with the metal theme, these  tubes would create some height in a new garden. They are simple and show off the unique succulents beautifully. What a lovely metal garden edge they would create. 


I love 'round.' It avoids the need for sharp and accurate corners. These concrete spheres create simplicity and a feeling of tranquillity. The garden glove has instructions for these and many other spherical garden features. 

Here is another quirky way to present succulents and add height with these concrete spheres on stilts.
A mystical glow is created with these hollow gold candle holders


Terracotta pots are fabulous. Cheap and cheerful, they can become much more than a single potted marigold. The instructions for this dome and a sphere are on iCreative Ideas
I love the simplicity of this couple that I found on ARCHITECTUREHD.
If I am to have a birdbath this is what I would like. Made by the very talented  Toni Armeni 


 Need a bit of quirk? These tin can owls are simple to make and are a creative way to use up pet food tins and containers that usually go to waste. Anyone could make these. 

 Everyone needs somewhere to sit in their garden and take in the view. Instructions are hardly needed for this concrete block and timber bench.
This ostrich, created by John Doll is almost 2 metres tall. 
I love scrapyard animals. The pieces used create a personality. Here are a couple of birds made out of shovels, reo and other left overs. 
All I need to do now is decide which one to make first.